IntroductionI have spent a few months testing and searching for solutions for my first Microsoft Deployment Toolkit(MDT) deployment. I have decided to share with you my knowledge.
My environment:
- Roughly 150 computers
- CPU's ranging from P4 to Core2Duo and even i3 arriving at the end of the summer.
- Two different domains in organisation
- Roughly 40 iMacs from 2009 running in dual boot
- Roughly 10 macMini from 2009 and 2010 running in dual boot
- All running Windows XP and MAC OS X where applicable.
Not a hardest in the world but considered deadly by many system administrators.
The idea was to learn and configure MDT 2010 so that I can do a Light Touch Installation (LTI) on all the platforms with minimum interaction possible. I have to admit: it is an impossible task if you have more than 3 different types of configurations.
PlanHere and in the following posts, I plan to present a set of obstacles and the solutions I have found in order to reach my goal. By the way, my goal was simple and solutions too,
just the process of finding them was hard.
The main idea was to create single point input LTI deployment that will not use a captured image but will rather do a clean install every time. The advantages of this type of install may be unclear, specifically in the setup when you have been using an out-dated version of Ghost and a single master computer for every different group of hardware you had.
However, the main idea of this type of configuration is that ultimately a single piece of software can be substituted by another one. The installation can be tweaked and improved: particular OEM customizations and registry rules can be applied. Finally, all this can be done by leaving clear traces of modifications that can be replicated by a knowledgeable people in a case that your lead admin is unavailable.
Part 1: Preparing the environmentI will not tell you how to install and configure your Deployment Share: there are now many tutorials on this and when I will find time I will post links to them here.
However, there are a set of rules to follow that took me some time to find out.
MDT 2010 Folder structure, copy and delete

As you will note MDT comes set up with 6 folders:
- Information Center - Contains all help files and Components folder to download updates
- MDT Deployment Share - all the data you will be working with
- Applications - the folder that will contains all software install during deployment
- Operating systems - all OS images imported into this share
- Out-of-Box Drivers - all drivers that have been imported into the share and can be injected into installed OS or Win PE
- Packages - All packages you can inject into installation
- Task Sequences - Contains all deployment Task Sequences you have created
- Advanced Configurations - Profiles, Linked Deployment Shares, Database connection etc.
The structure above is standard, but the things inside are left to you to organize. Every folder lets you create new folders inside it (except
Advanced Configuration). These folders will help you later to organize your tasks and applications in a simple manner.
Note few basic rules when you play with your folders or objects:
- Copy - does not create an exact and separate copy of the object. This operation will create a link/shortcut to the original object. It is useful in a case when you want to have a same driver in two different types of deployments or the same application in both x64 and x86 folders etc.
- Delete - does not necessary mean completely erasing the object. Let us consider a case when you have used a copy operation to create a link to an object and now you are trying to erase the primary object. You will be given an option to "erase the source even if other links exist to it "(enforce the delete) or not to enforce the delete. In the first case, the source and the primary link will be gone leaving the secondary link broken. The second option will allow you to keep the source data and the secondary link while erasing the primary link.
I have found that the interactions provided by
profiles and Win PE environment during deploy highly favour granular and structured approach to organising information particularly in
Applications and
Out-of-Box Drivers. I will repeat this again with more details but for now here is my highly questionable advice:
- Make sure that in your Applications folder you will have two root folders: one related with 32 bit deploy and the second with 64 bit deploy. Put each application in its own folder (by group or any other meaningful selection)
- Make sure that your drivers are organized in folders based on the hardware groups you have.
Given available time I will stop here and continue later. To come:
- revise and correct this post - OK
- discussion on applications and drivers
- sustainable app deployment
- task sequences
- customsettings.ini and automation process for LTI
- deploying to an iMac with dual boot
 First we need to examine the way Selection Profiles work.
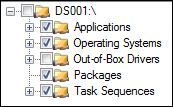 In both cases you will note that when you create a custom selection profile, you cannot select an individual driver or application: only folders can be selected. Thus, we need to organize our objects in folders if we want to control their selection.
